-->
Showing posts with label Thanksgiving. Show all posts

Wednesday, October 17, 2007

Two Different Pumpkin Pies to Try

Cooking and eating pumpkin pie is a special treat that can be added to a Halloween, Thanksgiving, or Fall Curriculum theme. Most of the mixing, measuring, pouring and such should be done by the children if they are old enough.

This no bake variety is especially good for the youngest group. You can buy pre-made graham cracker tarts or you can give them a bowl with graham crackers to crunch into tiny bits and then come around with a little bit of melted butter to make it a "crust" in their bowls. A second bowl can be used to mix together the pudding mix, milk and pie filling and then they can pour it onto their crust. You can also make it one big pie as follows:

You'll need:


  • 1 can PREPARED pumpkin pie filling
  • 1 package instant vanilla pudding
  • 1 cup milk
  • 1 prepared graham cracker pie shell

Mix the first three ingredients and then pour it into the shell. Eat right away or chill and eat.

Note that there is a difference between prepared pumpkin pie filling and canned pumpkin. They look similar, but the prepared filling has already been cooked and has spices added.

Now, the cooked version -- a real treat for school-agers. Top it with whipped cream -- real whipped cream. I'm so surprised to see a group of school-agers who don't even know that you can whip liquid cream and get whipped cream. It's right there in the name, but I think so many kids are used to cool whip, they don't even think about where it comes from. I know that there's a real trend in moving cooking out of classrooms because of liability issues, too, and I think that just stinks. (/tirade)

You'll need:


  • 3/4 cup sugar


  • 1/2 teaspoon salt


  • 2 teaspoons pumpkin pie spice


  • 2 eggs


  • 1 can pumpkin


  • 1 can evaporated milk


  • 1 unbaked 9 inch pie shell (or see recipe below)


And then do the following:


  1. Preheat the oven to 425 degrees F.


  2. Mix the sugar, salt and spice in a bowl.


  3. Beat the eggs and then stir in the pumpkin.


  4. Stir in the sugar mix.


  5. Stir in the evaporated milk.


  6. Pour it into the shell and bake it for 15 minutes.


  7. Reduce the heat to 350 and bake for another 45 minutes or until a knife inserted into the center comes out clean.


  8. Allow to cool for several hours and then serve topped with whipped cream.


You can make an easy pie crust even if you don't have a rolling pin. Just mix the following ingredients all together and then press it into the pie pan. This is a really fun part for the kids!


  • 1 1/2 cups flour


  • 1/2 teaspoon salt


  • 1 1/2 teaspoons sugar


  • 2 tablespoons milk


  • 1/2 cup canola oil


And now for the whipped cream... Just add about 2 cups of cream, 2 tablespoons of sugar and 1/2 teaspoon of vanilla to a cold metal bowl and beat on medium speed until you can see a trail left by the beaters when you drag them through the mix. Set the beaters on high and mix until it's as stiff as you'd like (should only take a minute or so more from that point.)

Tuesday, November 8, 2005

Arts and Crafts with Kudzu

I mentioned in the last post about using kudzu.

Kudzu is, for most, an irritating weed that takes over and kills native bushes, plants and trees.

You can harness the power of this fast-growing plant in your classroom by making baskets, trees, ornaments and even paper.

Here are some kudzu resources:

Kudzu Art -- The baskets that Regina Hines makes would make an interesting addition to your setting for storage of books, toys or other items. They could be used to make gifts for Mother's Day. She's also made wreaths, Christmas trees, angels and cornucopias, all appropriate group projects for this time of year.

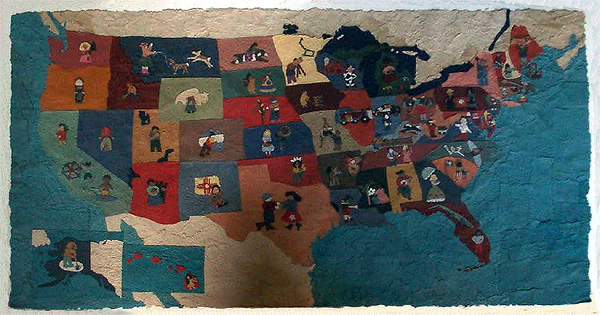
Kudzu Paper -- Nancy Basket made an amazing map using kudzu paper. It was displayed at the Southern Early Childhood Education Association convention in 2004. (picture here) You can make your own paper projects with the insructions at her site.

A great book to have as a resource is Kudzu in America. It has historical information, tips on usage (like cooking, clothing and crafts) and has over 150 photographs.

Bored with your Bulletin Boards?

If you're tired of the same-old, same-old, and you'd rather pull out your fingernails than rip off another piece of primary colored butcher paper to cover your bulletin boards -- try something different.

The holidays are upon us and it's a good time to start thinking about spicing up your bulletin board repertoire.

Here are some tips:


  • Don't use butcher paper. One way to start breaking away from this is to first experiment with other papers. Wrapping paper, wallpaper, tissue paper, cellophane, tin foil and newspaper are all good choices. Or try to find papers that are different, for instance try something with a shiny or metallic finish.


  • Don't lay it flat. Typically, teachers slap up the butcher paper and are careful to smooth it out before they staple it in place. Experiment with different textures. Before hanging it up, crinkle it, bend it, fold it... stuff newspaper under it. Tissue paper and cellophane are especially good for this.


  • Use something other than paper. Fabrics, plastics, metal, wood, paint or wall texturing (spackle is cheap), beads, string, ribbon, leather... One of the cutest bulletin boards I ever made was around this time of year. I had a classroom of three-year-olds and we were learning about the color brown. As an open activity in the art area, I would let two at a time come and cut brown paper with me in whatever shapes they wished (or could manage. At the end of the day I was left with... what looked like a lot of potatoes. So I decided to expand on that theme and talk about Thanksgiving foods. We made mashed potatoes the next day and did some potato prints and I made a bulletin board that was covered with a thin layer of straw and I fashioned a burlap sack for each child and carefully affixed their "potatoes" to the sacks.


  • Don't forget about your border. Couple a new type of border with your choice. For instance, if you find a wrapping paper with a subtle pattern that you want to use, pair it with a border of cloth ribbon. The easiest ribbons to work with are those with wire edging. It's bendable and stays in place without having to staple it to smithereens. You might also use feathers, beads, indian corn glued onto paper, bamboo, tiles for a mosaic effect, legos, old postage stamps (begin having parents save these from letters they've gotten), old fashioned pop bottle lids (like those that you need the opener for), old compact discs (like the AOL discs, glue new labels on them that have cute names of computer programs that reflect what you're learning or have your students' names on them. Let them decorate their own...)


  • Get ideas anywhere you go. Spend a few hours walking around your favorite craft store with your bulletin boards in mind. Or go to a home improvement store. Do not think about anything else while you're there, just browse the aisles and think, "Could I use that on a board?" You'll be surprised what you might see.

    For example... this month, there are already lots of things out for the winter holidays. So I might see that I could make border out of silver, gold or holly garland.

    I might stroll into the dollhouse department and see all the miniatures and find an idea for a bulletin board that involves making a house of sorts, I could use wallpaper scraps for each room, and buy or make (or have the children make) tiny furniture for each room. I could use old shingles or pieces of wood to fashion a roof and use indoor/outdoor grass-looking carpet for the bottom... And I could theme it for Thanksgiving... make an activity of it by asking the children to come up with things that we are thankful for in our homes, like electricity, running water, toilets, comfortable beds, good food or pets. I could label each "room" of the bulletin board with those things. Or maybe I could focus the theme on safety and could show how to keep each room safe — no toys on the stairs, carbon monoxide and smoke detectors, candles in safe places, harmful chemicals locked away...

    I might head to the cake-making aisle and find lots of ideas for a birthday bulletin board. The big number candles might look great if I make an individual cupcake for each child. And the cupcakes would be really eye-catching if instead of just running off a copy of a cute pattern, I use a metallic looking paper and fold it (like you would a fan) to make cupcake liners.


  • Don't buy it -- make it. Even if I don't buy those items, they can give me rich ideas. The tiny numbered candles might not be practical for my bulletin board, depending on size. And teachers are notoriously short on cash (I know I always am!) So I might make something that looks just like them instead with materials that I already have.


  • Look to nature for ideas. It's all too easy to slap up that paper border with the fall leaves on it, but why not use real leaves for a fall border? Take the kids on a walk or out on the playground if you have good trees and have them collect the leaves for the border. You can use sticks, bark, dried flowers or straw. If you have that irritating kudzu covering trees and bushes, you would be amazed at how great this stuff is for making woven borders and backgrounds. You can make baskets out of the stuff, even.


  • Involve the kids. The best bulletin boards are those that are interactive or are populated with work that came from the hands of your students. Like the above example of the potatoes, be open to expanding your daily activities into a display. It's good for parents to see what the children have been doing and it's fun for the kids to look at the board and remember the fun and learning they experienced with that activity.

Wednesday, November 2, 2005

Make a Turkey Book that Teaches Colors

This idea is based on the Brown Bear, Brown Bear book.

First you will need a turkey template to cut out and color. Here are a few nice ones:

Large Turkey

Turkey Coloring Page

Realistic Turkey (for those of you that dislike the cartoony looking line art, but keep in mind you'll be coloring them with bright colors)

I used a pattern that came out of a book, but you can freehand one if you're a good artist. I'm not. :)

You should think about what size your book will be before printing. You can make it two pages per sheet of paper and fold it or make a big book with one page per sheet. You may need to shrink your template on the copy machine or on your computer before printing.

What I did was use 2 sheets per page. I printed and colored my turkeys and hand lettered the book with, "BLUE turkey, BLUE turkey, what do you see?" (You have to start the book with the question, then the page following can have the answer, "I see a RED turkey looking at me." And then you have a "turkey" page saying, "RED turkey, RED turkey, what do you see?" And then on the next page, "I see a GREEN turkey looking at me." and then on the next page, "GREEN turkey, GREEN turkey, what do you see?" Continue until you've exhausted all your "color" options.

I mounted the pages on construction paper that was slightly larger and then covered with contact paper. Then I punched three holes along the side and held it all together with yarn.

If you are doing this book for toddlers, then you can stick to basic colors like blue, red, green, yellow... and keep the book short.

If you are doing it for older children, they will probably still enjoy the story, since it's a familiar favorite... but you can use more "advanced" colors such as lavender, fuschia, turquoise, etc.

I put the color names in all caps matching the color to help aid with sight recognition as well, which is good even for toddlers. You may not think they're getting it, but I've seen many children in my care recognize the word by sight somewhere else, long after we were done reading the book.

Here are some images:

Gluing the pages to construction paper


Click to enlarge image of pages being glued to construction paper

Red turkey, Red turkey...

Click to enlarge image of RED turkey pages

Green turkey, Green turkey...

Click to enlarge image of GREEN turkey pages